Step#1 - Creating the Item
Inventory Super User - Navigation: Items/Master Items
Enter item name and description
Table affected – MTL_SYSTEM_ITEMS_B

Copy from template tools – copy from –purchased item

Ensure it is Purchased and Purchasable under Purchasing tab

Ensure below attributes under Order management
Customer Ordered and Customer Orders Enabled, Shippable, Internal Ordered, Internal Orders Enabled, OE Transactable

Organization assignment
Assigning to M1 and M2 as M1 will be the destination inventory organization and M2 will be the Source Inventory Organization.

Please note here
In the Vision Demo instance, the Purchasing and Order Management Attributes are controlled at Item Master level. By choosing the attributes at the item master level (V1) automatically sets these attributes for all organizations which are assigned (ex. M1 and M2). By choosing the attributes at the Item Master level - they are already set for all inventory organizations assigned.
Step#2 - Shipping Network Creation
Inventory: Navigation: Setup/Organizations/Shipping Networks

Enter the Inventory Organization that will be the Source and the scope should be From or To Organizations
Choose the Transfer Type:
· Direct - means that when the Internal Sales Order is shipped the receipt process in the destination organization is done automatically
· Intransit - means that when the Internal Sales Order is shipped - the destination inventory organization has to manually do the receiving process in Purchasing
Choose Internal Order Required checkbox - Save
Please note here
If the Source and Destination Inventory Organizations are the same, then this step is conditionally not required. (Essentially the Item is being transferred between subinventories in the same Inventory Organization).
Step#3 - Internal Location Creation
Purchasing Super User: Setup/Organizations/Locations
The location created will be used to tie the Destination Location in the requisition form to the Internal Customer to be used on the Sales Order form.
Purchasing does not allow the entry of a Customer - therefore it passes the location to Order Management.
During Order Import in Order Management - the system locates the Customer Record to which the Location is assigned. Associating the location to the customer record will be done in the later steps.
During Order Import in Order Management - the system locates the Customer Record to which the Location is assigned. Associating the location to the customer record will be done in the later steps.

Assign the location to the inventory organization

Step#4 – Inventory creation using Miscellanous Transaction (Receipt) in source whs
Inventory: Navigation: Transactions/Miscellaneous Transactions
Choose the source inventory organization. For example M2 here, Misc receipt transaction will create an inventory for the item.
Table affected – MTL_MATERIAL_TRANSACTIONS

You can see onhand using material workbench
Inventory: Navigation: On- hand, Availability
Table affected – MTL_ONHAND_QUANTITIES_DETAIL

Step#5 - Create the Internal Customer - Assign the Location
Order Management Super User: Navigation: Customers/Standard

Add ship to and bill to
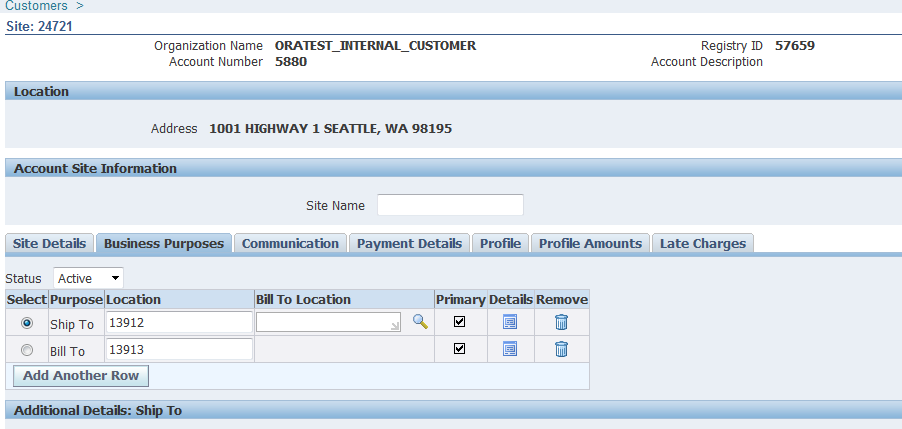
Under ship to add the location we have created, which is ORATEST_INTERNAL LOCATION

Step#6 - Item Price Information
Purchasing Super User: Items/Master Items
The price used on the requisition comes from the item costs section.
The price used on the requisition comes from the item costs section.
To view this information Query back the item Choose from the top text menu - Tools/Item Costs


Step#7 - Creating the Requisition
Purchasing Super User: Navigation - Requisitions/Requisitions
Table affected – PO_REQUISITION_HEADERS_ALL (segment1 is requisition number), PO_REQUISITION_LINES_ALL


Step#8 – Requisition Approval
By default requisition will not get approved it will in incomplete status, you will need to define approval in purchasing.
To get this tutorial going I have defined position based approval in purchasing adding those steps
1. Operating unit parameters
Purchasing Super User: Navigation – Setup, Organizations, Financial parameters
Uncheck the Use approval hierarchies check box

2. Define job
Purchasing Super User: Navigation – Setup, Personnel, Jobs
I have defined job as TEST IR APPROVER

3. Define Approval Group
Purchasing Super User: Navigation – Setup, Approvals, Approval Group

4. Approval assignments
Purchasing Super User: Navigation – Setup, Approvals, Approval Assignments
Assignments are done to job which we have defined in earlier step (TIR.TEST IR APPROVER)
I am assigning the job (TIR.TEST IR APPROVER) to approval group (TEST APPROVAL GROUP)

5. Employee creation /job assignment

Click on assignment; Assign the job to the employee

Once these steps have done you should able to approve the requisition.
Step#9 - Submitting the Create Internal Orders Concurrent Request
Purchasing Super User: Navigation - Reports/Run

Create Internal Orders will insert data into the Order Management interface Tables
Important columns inserted are
· location_id- Order Management uses this information to get the customer associated with the location
· calculate_price_flag- Will be N This means that Purchasing is going to pass the price and it will not be impacted or recalculated when imported into Order Management
· Create Internal Orders process does not pass any values from flexfields
Step#10 - Import the Internal Sales Order
Order Management Super User: Navigation: Orders, Returns/Import Orders/Order Import Request
Table affected – OE_HEADERS_IFACE_ALL, OE_LINES_IFACE_ALL

Step#11 – View the Internal Sales Order, book and reserve inventory
Find the order which was imported
Table affected – OE_ORDER_HEADERS_ALL, OE_ORDER_LINES_ALL
FLOW_STATUS_CODE is available in both the headers and lines tables which tell us the status of the order at each stage.


You can see the requisition number under others tab

Check the ship from location

Table affected –OE_ORDER_HEADERS_ALL (FLOW_STATUS_CODE is Entered)
Book the order, once booked allocate the inventory against the order
Table affected –
OE_ORDER_HEADERS_ALL (FLOW_STATUS_CODE is BOOKED)
OE_ORDER_LINES_ALL (FLOW_STATUS_CODE is AWAITING_SHIPPING)
WSH_DELIVERY_DETAILS (Records will be created in this table with RELEASED_STATUS=’R’ (Ready to Release))
WSH_DELIVERY_ASSIGNMENTS (Records will get created in this table also)


Table affected – MTL_RESERVATIONS (DEMAND_SOURCE_LINE_ID is OE_ORDER_LINES_ALL.line_id)

Step#12 – Pick Confirm the ISO (Internal Sales Order)
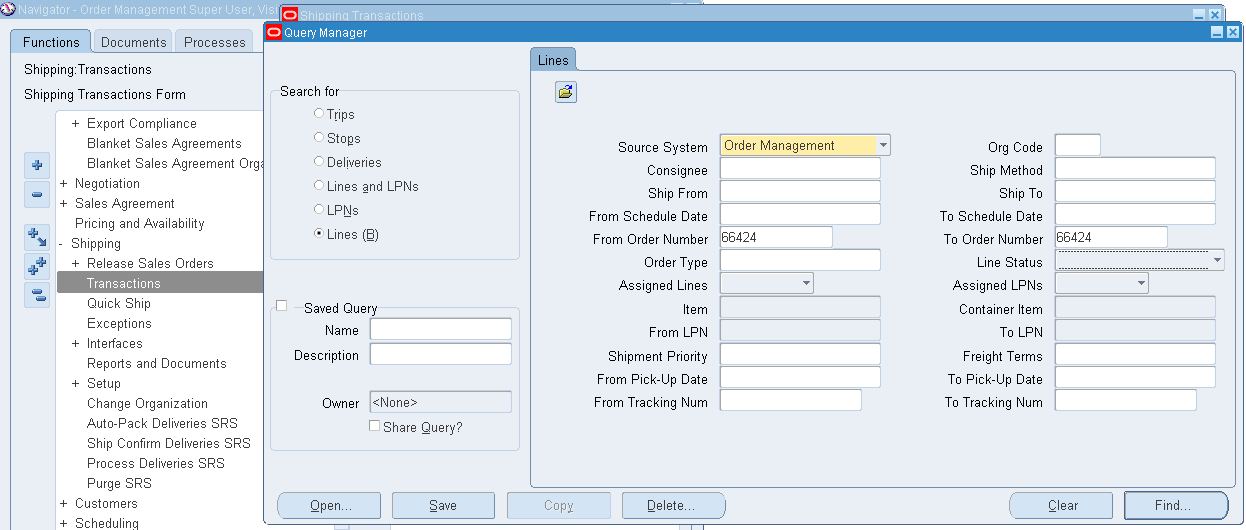
Order Management Super User: Navigation: shipping transactions
Grants
If you are seeing the shipping transactions menu under Action is disabled

Then setup, shipping, grants and Role definitions, grants
Enter the user name and role as upgrade Role

Pick release the order
Order Management Super User: Navigation: shipping transactions
Query the order and use launch pick release under actions and click go
Table affected –
If Autocreate Delivery is set to ‘Yes’ then a new record is created in the table WSH_NEW_DELIVERIES
DELIVERY_ID is populated in the table WSH_DELIVERY_ASSIGNMENTS
The RELEASED_STATUS in WSH_DELIVERY_DETAILS would be now set to ‘Y’ (Pick Confirmed) if Auto Pick Confirm is set to Yes otherwise RELEASED_STATUS is ‘S’ (Release to Warehouse).

Behind the scene it will submit program as Pick Selection List Generation which will pick confirm the order
If you query back the order, you should be seeing the line status as Staged/Pick Confirmed

So as the order line status will change from awaiting shipping to picked

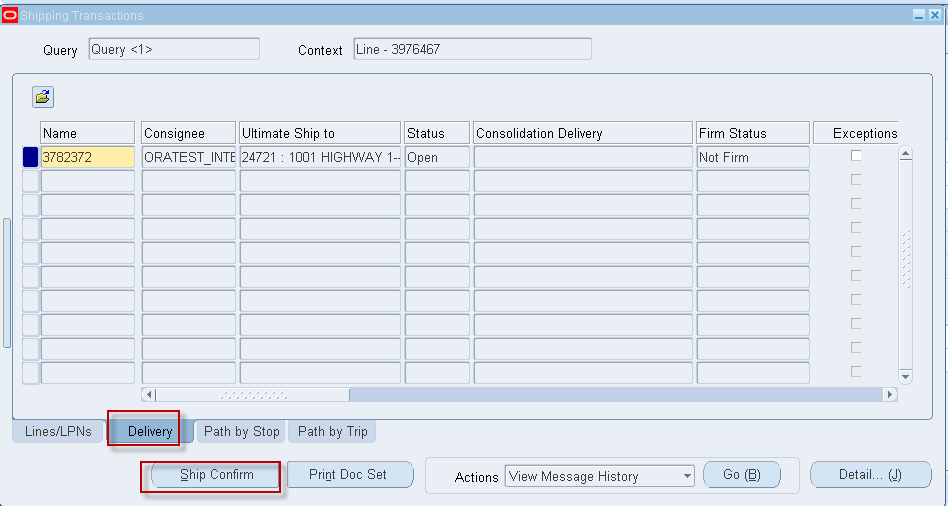
Step#13 – Ship Confirm the ISO (Internal Sales Order)
Order Management Super User: Navigation: shipping transactions
Query the order and click on delivery tab and then click on ship confirm
Table affected –
RELEASED_STATUS in WSH_DELIVERY_DETAILS would be C (Ship Confirmed)
FLOW_STATUS_CODE in OE_ORDER_HEADERS_ALL would be BOOKED
FLOW_STATUS_CODE in OE_ORDER_LINES_ALL would be SHIPPED
FLOW_STATUS_CODE in OE_ORDER_HEADERS_ALL would be BOOKED
FLOW_STATUS_CODE in OE_ORDER_LINES_ALL would be SHIPPED
Click ok

Behind the scene it will submit Interface Trip Stop which will now actually reduce inventory
If you query back the order on shipping transaction you should see the order status as shipped.
If it’s shipped then you need to run the workflow background process

Once successfully completed you shall see the order as interfaced under shipping transactions

At this point the order is shipped fully.
The next step is Sales Order was shipped from the source inventory organization (M2) and needs to be received into the destination inventory organization (M1).
Step#14 – Receive the ISO (Internal Sales Order)
Receive the ISO in destination organization
Purchasing Super User: Navigation – Receiving, receipts
Select the destination organization M1 here
You can receive by requisition number or the shipment number (shipment number is nothing but the delivery number of an order). In case if the order is shipped with multiple deliveries then suggestion would be receive by shipment number.
Table affected –
RCV_SHIPMENT_HEADERS (shipment_num is oracle delivery number, SHIPMENT_LINE_STATUS_CODE shows fully received partially received)
RCV_SHIPMENT_LINES (RCV_SHIPMENT_HEADERS.shipment_header_id, to_organization_id, quantity_shipped, quantity_received
rcv_transactions and mtl_material_transactions- shows the receiving transactions

Check the line and click save


You can cross check the receipts under receiving transactions summery

