OPM Example
Taking an example of chocolate process manufacturing where
A Finished good comprised with two ingredients as below
Finished Good- Chocolate FG
Ingredients- Chocolate Syrup and Chocolate-Water
Step#1 – Inventory Organization Parameters
Inventory - Navigation: Setup/Organizations/Parameters
Inventory Organization is a plant where the batches are produced or an organization that holds the inventory at specified locations.
Inventory organization as process manufacturing enabled

Step#2 – Inventory Item Attributes
Inventory - Navigation: Items /Master Items
Product, all the ingredients and by-products to be used for the production are defined as inventory items, process manufacturing enabled and must be assigned to the process manufacturing enabled inventory organization (ORA in this example)


Ingredients


Step#3 – Define Resources
OPM ALL- Navigation: Process Engineer /Setup/Generic Resource
OPM setups can be explained as below diagram.

• Routing composed of a series of Operations organized in Steps.
• Operations composed of Activities containing Resources.
• Formula composed of Ingredient, Product, and possibly Byproduct.
• Recipe linking the Routing and Formula together with Processing Instructions
Define and maintain resources on the Operation Activity window. Resources are the assets to produce batches, including production equipment, and employee labor. You can define each resource generally, for example, OVENS, or specifically OVEN 1, OVEN2 . . . OVEN n. For each resource, assign a classification code for cost management purposes. You can group resources into resource classifications, for example, group OVENS and STOVES into COOKING UNITS.

Step#4– Define Operations
OPM ALL- Navigation: Process Engineer/ Process Operations
Operations are nothing but combinations of activities that are required to perform production.

Under activity you can assign related activity
And you can then tie up the resource which we created above to this activity.
So Operations consists of activities and activities consist of resources.

Change the status of the operations as approved for general use.


One can define multiple operations consisting of different activities like mixing rectification etc.
Step#5 – Define Routing
OPM ALL- Navigation: Process Engineer /Process Routings
A routing is a sequenced set of operations to perform to complete a production batch.
In this step we are creating Routing and assigning the above created operation.

Change the status for approving it by Actions and Change Status.
Once changed from new to approved for general use you will see status changed as below.

Step#6 – Define organization as plant and/laboratory
Product Development Security Manager- Navigation: Organization Parameters

In the Yield UOM field. This is UOM of final output product.
Step#7 – Define Formula
OPM ALL- Navigation: Formulator/Formulas
In formula you can decide things like Finished Good would need what kind of ingredient and what will be by product.
In this example
I am making Chocolate as Finished Good and ingredients will be Chocolate Syrup and Chocolate Water (all are process manufacturing enabled Inventory items)
I am making Chocolate as Finished Good and ingredients will be Chocolate Syrup and Chocolate Water (all are process manufacturing enabled Inventory items)
And no By-Product


Change the status for approving it by Actions and Change Status.
Once changed from new to approved for general use you will see status changed as below

Step#7 – Define Recipe
OPM ALL- Navigation: Formulator/Recipe
Recipes standardize the structure of all information that describes production of one or more products. Recipes have:
• Formulas that define the relationship of material resources, including products, ingredients, and byproducts.
• Routings that define the relationships of nonmaterial resources, including labor and equipment operations with activities and their associated resource. Routings are optional.
• Processing instructions that encompass the work instructions needed to produce the products.
Formulas and routings are built independently. They are linked using a Recipe that has validity rules. Different formulas can use the same routing, or one formula can be associated to several different routings.

Click on Validity Rules and enter organization name

Make it approved for general use(from actions – change status)

Also click on validity rule and then make it also approved for general use (from actions – change status)

Step#8 – Batch Numbering
OPM ALL- Navigation: Production Supervisor/Setup/Parameter
This will put the batch creation sequence to automatic.

Step#9 – Batch Creation
OPM ALL- Navigation: Production Supervisor/Create Document
Enter the recipe name

Under product output tab enter the product and product qty for the batch needs to created.

Click ok and note the batch number

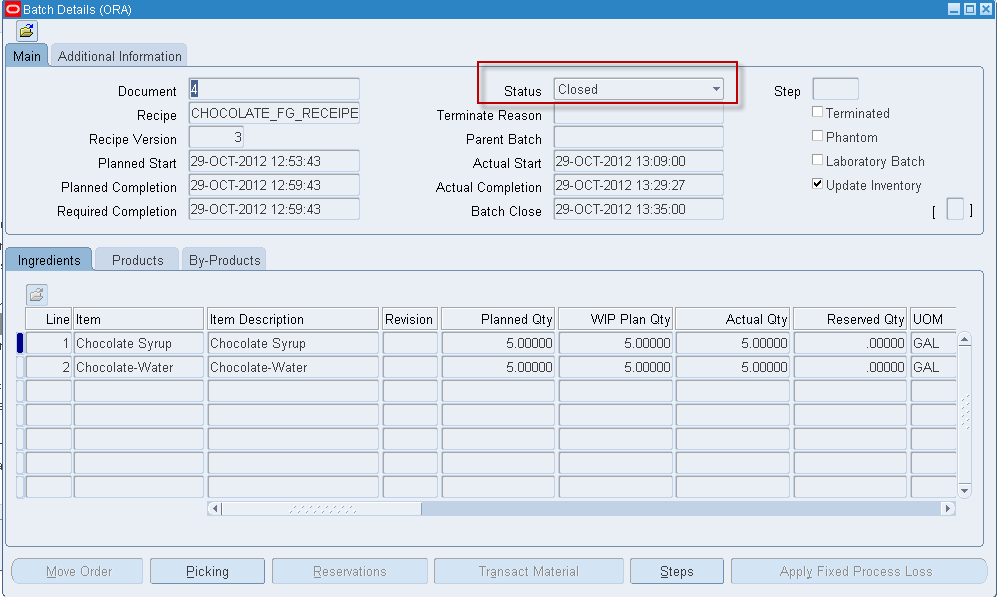
Step#10 – Viewing the Batch
OPM ALL- Navigation: Production Supervisor/Batch details
Use the above created batch and click find

Batch would be visible as
We created batch for 10 qty and per formula it will take two ingredients and according to formula plan qty it will show the wip plan qty
Note – as an when we transact material the actual qty will get updated.


Step#11 –Release the Batch
OPM ALL- Navigation: Production Supervisor/Batch details
Use the above created batch and click find
Batch goes through below different status
| Description | Status | Notes |
| Initial creation | Pending | |
| Cancel the batch | Cancelled | |
| Release the batch | WIP | Can revert back to Pending |
| Complete the batch | Completed | Can revert back to WIP- Caution- can lose the material transactions |
| Close the batch | Closed | Final Close can't revert back |
From Actions – release the batch

It will show you actual start date to release the batch click ok and click proceed, once released note the status of the batch it will be WIP.

Once released then only you can assign the material transactions against the ingredients and finished good.
Step#12 –Process the Batch
OPM ALL- Navigation: Production Supervisor/Batch details
Use the above created batch and click find, make sure it’s in WIP
Click on transact material
Please note – when you do the transact material you will have below transaction types depending upon ingredient or finished good.
| Transaction type | Item type |
| Wip issue | Ingredient |
| Wip Completion | Finished Good |
As we are processing the batch I have created inventory available for ingredients by Inventory – transactions- miscellaneous transactions- miscellaneous receipt.
Click on the ingredient and select the transaction type, enter subinventory, locator and Lot information and click transact

As soon as you transact the material you can see the actual quantity reflected.

To view the material transacted you can look by Inventory – view Material transactions


Transacting the Finished Good
Follow same steps and complete the transaction for Finished Good. The transaction will be Wip Completion.

If you look by Inventory –Material transactions, it will show the same transactions which we were looking from above window.

Step#12 –Complete the Batch
OPM ALL- Navigation: Production Supervisor/Batch details
Make sure all ingredients are transacted and finished good is recorded, you can complete the batch using actions- complete the batch.

It will ask you the actual completion date click ok and complete the batch

Step#13 –Close the Batch
OPM ALL- Navigation: Production Supervisor/Batch details
Make sure batch is completed. Click on actions- close

It will prompt you batch close date
This explains the full flow from start to end towards process manufacturing production.
Thanks,
Ajay


